Back into printmaking
For the past 10 years or so, we have worked with Flexcut, a toolmaker for printmakers and carvers. In a lot of ways, they felt like a dream client for me. They make great products, sell online, and speak to an audience I understand really well, artists and makers.
By the time we started working with them, it had probably been 15 to 20 years since I had done any real printmaking or carving back in college. Still, there was always something about it that stuck with me. I have always liked the strong black and white contrast, and I like that the process is hands on from start to finish. You start with an idea, sketch it out, carve it away, ink it up, and then pull a print. Even when you use the same block, no two prints are ever exactly alike.
My process is pretty simple.
1. It starts with a sketch. I will come up with a concept and rough it out in pencil on an 8.5 x 11 sheet of paper. At first it is loose and messy. Then I start filling in darker areas, tightening shapes, and figuring out what needs to stay black and what will be carved away.
2. I rub the drawing onto the block. I am a big fan of Speedball carving blocks and use them often in my process. I'll use the same graphite pencil as I used to draw, then flip it over and transfer it to the block.
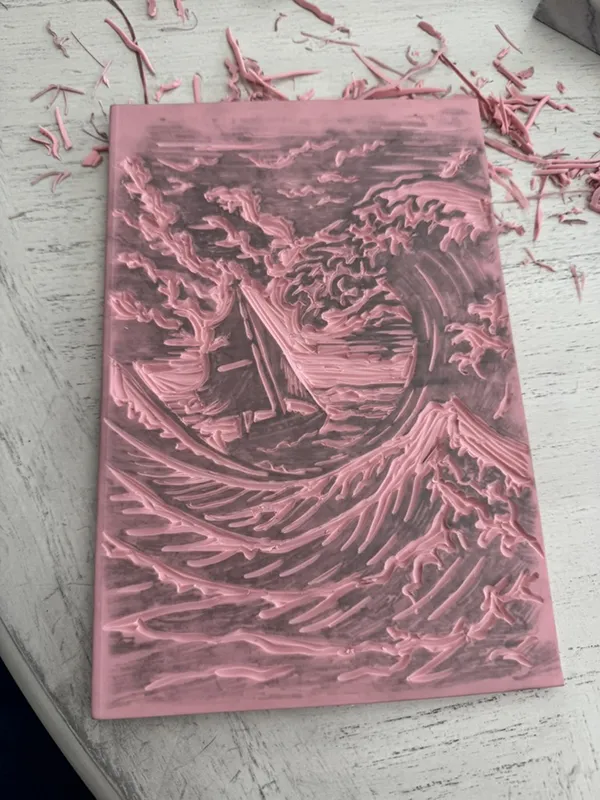
3. Carving. Once the design is on the block, I start carving. Before I do, I may darken a few areas with pen, marker, or Sharpie so I can see the shapes more clearly. This is the part where I use Flexcut tools, which really do cut like butter. I use a few different sets, but the one I reach for most is the Deluxe Palm Set.
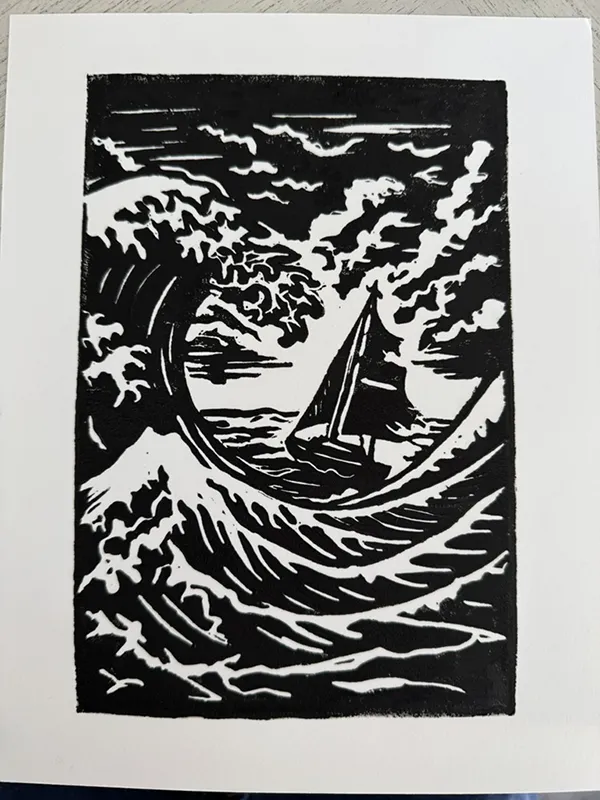
4. Ink. After the carving is done, I ink the block with a roller and make sure I get a good, even coat across the surface.
5. Then it is time to print. I place the block on the press and use a combination of pressure from a small printmaking press I bought online and some good old fashioned spoon rubbing. I usually rotate it a few times, then finish by hand with the spoon. That tends to give me a nice strong black.
6. Fill in details. After I pull the print, I sometimes do a little touch up. I will mix a small amount of water with the ink and use a brush to fill in any spots that need a little heavier coverage. I may also add some marker or elements with watercolor to help set focus on certain areas of the piece.
7. The reveal. That is when you finally get to see how it all came together. If the print turns out well, I can pull a few more from the same block, usually on printmaking paper.
That is probably one of the things I like most about printmaking. It has structure, but it still feels alive. You can repeat the process, but each piece still has its own character.